之前的几篇文章(从
起),介绍了嵌入式了Linux的系统移植(uboot、内核与根文件系统)以及使用MfgTool工具将系统烧讲到板子的EMMC中。
本篇开始介绍嵌入式Linux驱动开发。
内容较多,先看目录:
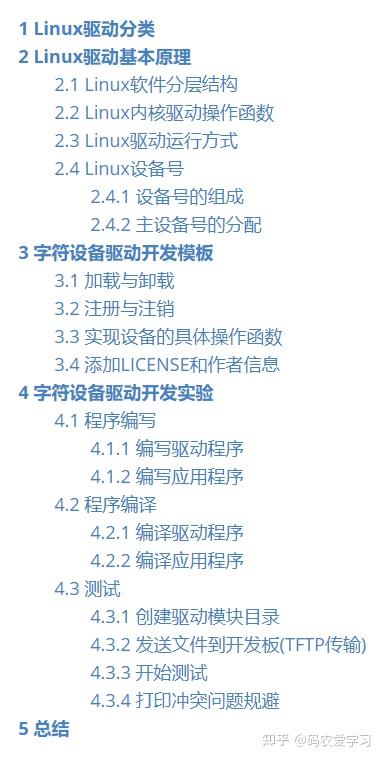
1Linux驱动分类
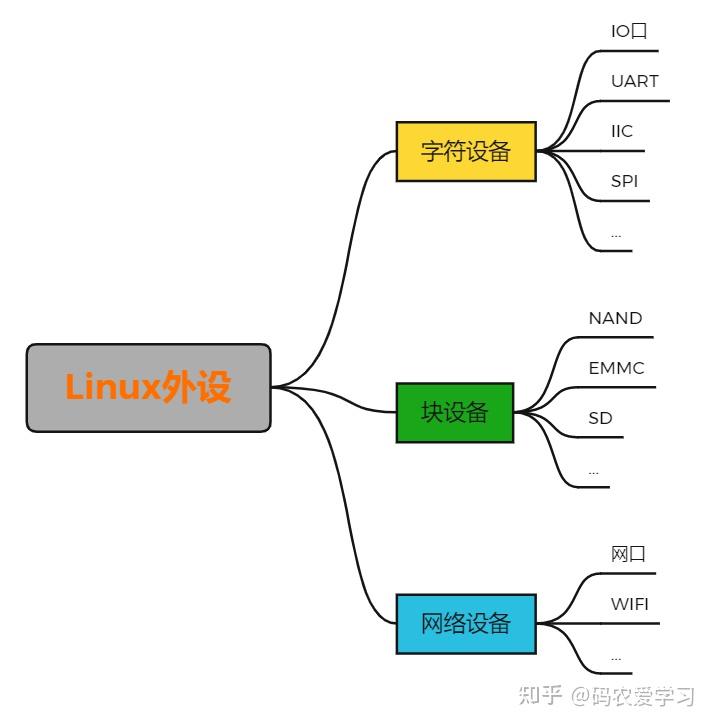
Linux中的外设驱动可以分为三大类:字符设备驱动、块设备驱动和网路设备驱动。
2Linux驱动基本原理
在Linux中一切皆文件,驱动加载成功之后会在“/dev”目录下生成一个相应的文件,应用程序通过对这个名为“/dev/xxx”的文件进行相应的操作即可实现对硬件的操作。
例如最简单的点灯功能,会有/dev/led这样的驱动文件,应用程序使用open函数来打开文件/dev/led,假如要照亮或关掉led,这么就使用write函数写入开关值,假如要获取led的状态,就用read函数从驱动中读取相应的状态,使用完成之后使用close函数关掉/dev/led这个文件。
2.1Linux软件分层结构
Linux软件从上到下可以分层4层结构,以控制LED为例:
应用程序运行在用户空间,而Linux驱动属于内核的一部份,因而驱动运行于内核空间。当应用层通过open函数打开/dev/led这个驱动时,因用户空间不能直接操作内核,因而会使用“系统调用”的方式来从用户空间“陷入”到内核空间,实现对底层驱动的操作。

例如应用程序调用了open这个函数,则在驱动程序中也应有一个对应的open的函数。

2.2Linux内核驱动操作函数
每一个系统调用,在驱动中都有与之对应的一个驱动函数linux 驱动 开发,在Linux内核文件include/linux/fs.h中有个file_operations结构体,就是Linux内核驱动操作函数集合:
struct file_operations {
    struct module *owner;
    loff_t (*llseek) (struct file *, loff_t, int);
    ssize_t (*read) (struct file *, char __user *, size_t, loff_t *);
    ssize_t (*write) (struct file *, const char __user *, size_t, loff_t *);
    ssize_t (*read_iter) (struct kiocb *, struct iov_iter *);
    ssize_t (*write_iter) (struct kiocb *, struct iov_iter *);
    int (*iterate) (struct file *, struct dir_context *);
    unsigned int (*poll) (struct file *, struct poll_table_struct *);
    long (*unlocked_ioctl) (struct file *, unsigned int, unsigned long);
    long (*compat_ioctl) (struct file *, unsigned int, unsigned long);
    int (*mmap) (struct file *, struct vm_area_struct *);
    int (*mremap)(struct file *, struct vm_area_struct *);
    int (*open) (struct inode *, struct file *);
    int (*flush) (struct file *, fl_owner_t id);
    int (*release) (struct inode *, struct file *);
    int (*fsync) (struct file *, loff_t, loff_t, int datasync);
    int (*aio_fsync) (struct kiocb *, int datasync);
    int (*fasync) (int, struct file *, int);
    /*省略若干行...*/
};
其中有关字符设备驱动开发中常用的函数有:
2.3Linux驱动运行方法
Linux驱动有两种运行方法:
在驱动开发阶段通常都将其编译为模块,不须要编译整个Linux代码,便捷调试驱动程序。当驱动开发完成后,按照实际须要,可以选择是否将驱动编译进Linux内核中。
2.4Linux设备号2.4.1设备号的组成
Linux中每位设备都有一个设备号,设备号由主设备号和次设备号两部份组成。
Linux提供了名为dev_t的数据类型表示设备号,其本质是32位的unsignedint数据类型,其中高12位为主设备号,低20位为次设备号,因而Linux中主设备号范围为0~4095。
在文件include/linux/kdev_t.h中提供了几个关于设备号操作的宏定义:
#define MINORBITS 20
#define MINORMASK ((1U << MINORBITS) - 1)
#define MAJOR(dev) ((unsigned int) ((dev) >> MINORBITS))
#define MINOR(dev) ((unsigned int) ((dev) & MINORMASK))
#define MKDEV(ma,mi) (((ma) << MINORBITS) | (mi))2.4.2主设备号的分配
主设备号的分配包括静态分配和动态分配
设备号的申请函数:
/*
* dev:保存申请到的设备号
* baseminor:次设备号起始地址,一般baseminor为0 (次设备号以baseminor为起始地址地址开始递)
* count:要申请的设备号数量
* name:设备名字
*/
int alloc_chrdev_region(dev_t *dev, unsigned baseminor, unsigned count, const char *name)
设备号的释放函数:
/*
* from:要释放的设备号
* count:表示从from开始,要释放的设备号数量
*/
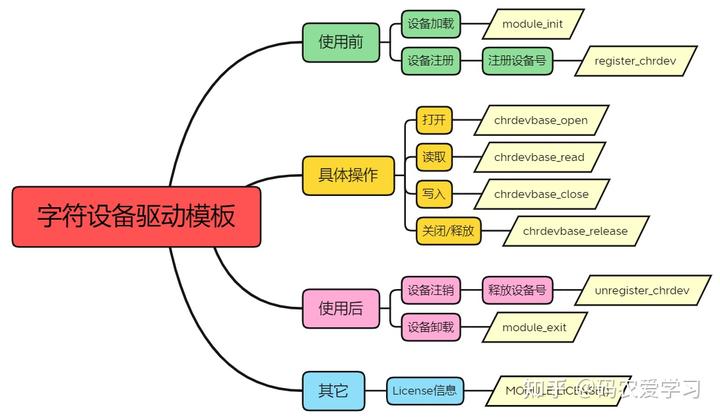
void unregister_chrdev_region(dev_t from, unsigned count) 3字符设备驱动开发模板3.1加载与卸载
在编撰驱动的时侯须要注册模块加载和卸载这两种函数:
module_init(xxx_init);   //注册模块加载函数
module_exit(xxx_exit);   //注册模块卸载函数
字符设备驱动模块加载和卸载模板如下所示:
/* 驱动入口函数 */
static int __init xxx_init(void)
{
/*入口函数内容 */
return 0;
}
/* 驱动出口函数 */
static void __exit xxx_exit(void)
{
/*出口函数内容*/
}
/*指定为驱动的入口和出口函数 */
module_init(xxx_init);
module_exit(xxx_exit); 驱动编译完成之后扩充名为.ko,有两种命令可以加载驱动模块:
卸载驱动也有两种命令:
3.2注册与注销
对于字符设备驱动而言,当驱动模块加载成功之后须要注册字符设备,同样,卸载驱动模块的时侯也须要注销掉字符设备。
字符设备的注册函数原型如下所示:
/* func: register_chrdev 注册字符设备
* major:主设备号
* name:设备名字,指向一串字符串
* fops:结构体 file_operations 类型指针,指向设备的操作函数集合变量
*/
static inline int register_chrdev(unsigned int major, const char *name, const struct file_operations *fops)
字符设备的注销函数原型如下所示:
/* func: unregister_chrdev 注销字符设备
* majo:要注销的设备对应的主设备号
* name:要注销的设备对应的设备名
*/
static inline void unregister_chrdev(unsigned int major, const char *name)
通常字符设备的注册在驱动模块的入口函数xxx_init中进行linux怎么查看系统版本,字符设备的注销在驱动模块的出口函数xxx_exit中进行。
static struct file_operations test_fops;
/* 驱动入口函数 */
static int __init xxx_init(void)
{
/* 入口函数具体内容 */
int retvalue = 0;
/* 注册字符设备驱动 */
retvalue = register_chrdev(200, "chrtest", &test_fops);
if(retvalue < 0)
{
/* 字符设备注册失败, 自行处理 */
}
return 0;
}
/* 驱动出口函数 */
static void __exit xxx_exit(void)
{
/* 注销字符设备驱动 */
unregister_chrdev(200, "chrtest");
}
/* 将上面两个函数指定为驱动的入口和出口函数 */
module_init(xxx_init);
module_exit(xxx_exit); 注:选择没有被使用的主设备号,可输入命令“cat/proc/devices”来查看当前早已被使用掉的设备号3.3实现设备的具体操作函数
file_operations结构体就是设备的具体操作函数。
假定对chrtest这个设备有如下两个要求:
首先是打开(open)、读取(read)、写入(write)、释放(release)4个基本操作
/*打开设备*/
static int chrtest_open(struct inode *inode, struct file *filp)
{
/*用户实现具体功能*/
return 0;
}
/*从设备读取*/
static ssize_t chrtest_read(struct file *filp, char __user *buf, size_t cnt, loff_t *offt)
{
/*用户实现具体功能*/
return 0;
}
/*向设备写数据*/
static ssize_t chrtest_write(struct file *filp, const char __user *buf, size_t cnt, loff_t *offt)
{
/*用户实现具体功能*/
return 0;
}
/*关闭释放设备*/
static int chrtest_release(struct inode *inode, struct file *filp)
{
/*用户实现具体功能*/
return 0;
} 之后是驱动的入口(init)和出口(exit)函数:
/*文件操作结构体*/
static struct file_operations test_fops = {
.owner = THIS_MODULE,
.open = chrtest_open,
.read = chrtest_read,
.write = chrtest_write,
.release = chrtest_release,
};
/*驱动入口函数*/
static int __init xxx_init(void)
{
/*入口函数具体内容*/
int retvalue = 0;
/*注册字符设备驱动*/
retvalue = register_chrdev(200, "chrtest", &test_fops);
if(retvalue < 0)
{
/*字符设备注册失败*/
}
return 0;
}
/*驱动出口函数*/
static void __exit xxx_exit(void)
{
/*注销字符设备驱动*/
unregister_chrdev(200, "chrtest");
}
/*指定为驱动的入口和出口函数*/
module_init(xxx_init);
module_exit(xxx_exit); 3.4添加LICENSE和作者信息
LICENSE是必须添加的,否则编译时会报错,作者信息可加可不加。
MODULE_LICENSE()  //添加模块 LICENSE 信息
MODULE_AUTHOR()   //添加模块作者信息
总结一下:
4字符设备驱动开发实验
下边以正点原子提供的教程中的chrdevbase这个虚拟设备为例,完整的编撰一个字符设备驱动模块。chrdevbase不是实际存在的一个设备,只是为了学习字符设备的开发的流程。
4.1程序编撰
须要分别编撰驱动程序和应用程序。
注:为了分辨两个程序的复印信息,在驱动程序的复印前都添加“[BSP]”标识,在应用程序的复印前都添加”[APP]“标识。4.1.1编撰驱动程序
#define CHRDEVBASE_MAJOR 200 /*主设备号*/
#define CHRDEVBASE_NAME "chrdevbase" /*设备名*/
static char readbuf[100]; /*读缓冲区*/
static char writebuf[100]; /*写缓冲区*/
static char kerneldata[] = {"kernel data!"}; /*内核驱动中的数据,用来测试应用程序读取该数据*/
/*
* @description : 打开设备
* @param - inode : 传递给驱动的inode
* @param - filp : 设备文件,file结构体有个叫做private_data的成员变量
* 一般在open的时候将private_data指向设备结构体。
* @return : 0 成功;其他 失败
*/
static int chrdevbase_open(struct inode *inode, struct file *filp)
{
printk("[BSP] chrdevbase open!n");
return 0;
}
/*
* @description : 从设备读取数据
* @param - filp : 要打开的设备文件(文件描述符)
* @param - buf : 返回给用户空间的数据缓冲区
* @param - cnt : 要读取的数据长度
* @param - offt : 相对于文件首地址的偏移
* @return : 读取的字节数,如果为负值,表示读取失败
*/
static ssize_t chrdevbase_read(struct file *filp, char __user *buf, size_t cnt, loff_t *offt)
{
int retvalue = 0;
/* 向用户空间发送数据 */
memcpy(readbuf, kerneldata, sizeof(kerneldata));
retvalue = copy_to_user(buf, readbuf, cnt);
if(retvalue == 0)
{
printk("[BSP] kernel senddata ok!n");
}
else
{
printk("[BSP] kernel senddata failed!n");
}
printk("[BSP] chrdevbase read!n");
return 0;
}
/*
* @description : 向设备写数据
* @param - filp : 设备文件,表示打开的文件描述符
* @param - buf : 要写给设备写入的数据
* @param - cnt : 要写入的数据长度
* @param - offt : 相对于文件首地址的偏移
* @return : 写入的字节数,如果为负值,表示写入失败
*/
static ssize_t chrdevbase_write(struct file *filp, const char __user *buf, size_t cnt, loff_t *offt)
{
int retvalue = 0;
/* 接收用户空间传递给内核的数据并且打印出来 */
retvalue = copy_from_user(writebuf, buf, cnt);
if(retvalue == 0)
{
printk("[BSP] kernel recevdata:%sn", writebuf);
}
else
{
printk("[BSP] kernel recevdata failed!n");
}
printk("[BSP] chrdevbase write!n");
return 0;
}
/*
* @description : 关闭/释放设备
* @param - filp : 要关闭的设备文件(文件描述符)
* @return : 0 成功;其他 失败
*/
static int chrdevbase_release(struct inode *inode, struct file *filp)
{
printk("[BSP] chrdevbase release!n");
return 0;
}
/*
* 设备操作函数结构体
*/
static struct file_operations chrdevbase_fops = {
.owner = THIS_MODULE,
.open = chrdevbase_open,
.read = chrdevbase_read,
.write = chrdevbase_write,
.release = chrdevbase_release,
};
/*
* @description : 驱动入口函数
* @param : 无
* @return : 0 成功;其他 失败
*/
static int __init chrdevbase_init(void)
{
int retvalue = 0;
/* 注册字符设备驱动 */
retvalue = register_chrdev(CHRDEVBASE_MAJOR, CHRDEVBASE_NAME, &chrdevbase_fops);
if(retvalue < 0)
{
printk("[BSP] chrdevbase driver register failedn");
}
printk("[BSP] chrdevbase init!n");
return 0;
}
/*
* @description : 驱动出口函数
* @param : 无
* @return : 无
*/
static void __exit chrdevbase_exit(void)
{
/* 注销字符设备驱动 */
unregister_chrdev(CHRDEVBASE_MAJOR, CHRDEVBASE_NAME);
printk("[BSP] chrdevbase exit!n");
}
/*将上面两个函数指定为驱动的入口和出口函数*/
module_init(chrdevbase_init);
module_exit(chrdevbase_exit);
/*LICENSE和作者信息*/
MODULE_LICENSE("GPL");
MODULE_AUTHOR("zuozhongkai & xxpcb"); //本篇的程序代码在“正点原子”左大神提供的代码上进行修改
4.1.2编撰应用程序
这儿把程序截取为3段剖析,首先看开头:
#include "stdio.h"
#include "unistd.h"
#include "sys/types.h"
#include "sys/stat.h"
#include "fcntl.h"
#include "stdlib.h"
#include "string.h"

static char usrdata[] = {"usr data!"}; /*应用程序中的数据,用于测试通过驱动访问写入内核*/
int main(int argc, char *argv[])
{
	int fd, retvalue;
	char *filename;
	char readbuf[100], writebuf[100];
	if(argc != 3)
    {
		printf("[APP] Error Usage!n");
		return -1;
	}
    //参数1是驱动的文件名,用来指定驱动的位置
	filename = argv[1];
	//【1】打开驱动文件
	fd  = open(filename, O_RDWR);
	if(fd < 0)
    {
		printf("[APP] Can't open file %sn", filename);
		return -1;
	}
    printf("[APP] open file: '%s' successn", filename);
主要是一些头文件和main函数入口,调用main函数时须要传入2个参数(实际是3个参数,函数名本身是默认的第0个参数,不须要自动指定),具体作用为:
再来看具体操作:
    //【2】从驱动文件读取数据
	if(atoi(argv[2]) == 1)//参数1表示【读取】内核中的数据
    {
		retvalue = read(fd, readbuf, 50);
		if(retvalue < 0)
        {
			printf("[APP] read file '%s' failed!n", filename);
		}
        else
        {
			/* 读取成功,打印出读取成功的数据 */
			printf("[APP] read data:%sn",readbuf);
		}
	}
    //【3】向设备驱动写数据
	if(atoi(argv[2]) == 2)//参数2表示向内核中【写入】数据
    {
		memcpy(writebuf, usrdata, sizeof(usrdata));
		retvalue = write(fd, writebuf, 50);
		if(retvalue < 0)
        {
			printf("[APP] write file %s failed!n", filename);
		}
        else
        {
            printf("[APP] write data:'%s' to file okn", writebuf);
        }
	}
最后是关掉设备:
	//【4】关闭设备
	retvalue = close(fd);
	if(retvalue < 0)
    {
		printf("[APP] Can't close file %sn", filename);
		return -1;
	}
	printf("[APP] close file okrn");
	return 0;
}
关掉即表示不再使用该设备了(若要再使用则重新打开即可)linux 下载工具,通过关掉驱动文件来实现字符设备驱动的关掉。
4.2程序编译4.2.1编译驱动程序

编译驱动,即编译chrdevbase.c这个文件为.ko模块,使用Makefile来编译,先创建Makefile:
KERNELDIR := /home/xxpcb/myTest/imx6ull/kernel/nxp_kernel/linux-imx-rel_imx_4.1.15_2.1.0_ga
CURRENT_PATH := $(shell pwd)
obj-m := chrdevbase.o
build: kernel_modules
kernel_modules:
	$(MAKE) -C $(KERNELDIR) M=$(CURRENT_PATH) modules
clean:
	$(MAKE) -C $(KERNELDIR) M=$(CURRENT_PATH) clean
各行涵义:
输入“make”命令即可编译,编译后会出现许多编译文件
注:若直接make编译报如下错误,是由于kernel中没有指定编译器和构架,使用了默认的x86平台编译报错。
更改Kernel工程的顶楼Makefile,直接定义ARCH和CROSS_COMPILE这两个的变量值为arm和arm-linux-gnueabihf-
(内核篇的介绍见:

4.2.2编译应用程序
编译应用程序不须要内核文件参与,只有一个文件能够编译linux 驱动 开发,因而直接输入指令进行编译:
arm-linux-gnueabihf-gcc chrdevbaseApp.c -o chrdevbaseApp编译会生chrdevbaseApp,它是32位LSB格式的ARM版本可执行文件
4.3测试